A student performs an experiment of measuring the thickness of a slab with a vernier calliper whose divisions the vernier scale are equal to divisions of the main scale. He noted that zero of the vernier scale is between and mark of the main scale and division of the vernier scale exactly coincides with the main scale. The measured value of the thickness of the given slab using the calliper will be:
Important Questions on Physics and Measurement
| S.No. | MS (cm) | VS divisions |
| 1. | 0.5 | 8 |
| 2. | 0.5 | 4 |
| 3. | 0.5 | 6 |
If the zero error is - 0.03 cm, then mean corrected diameter is:
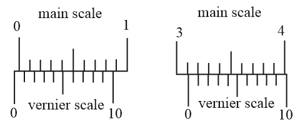
The smallest division on the main scale of a Vernier calipers is . Ten divisions of the Vernier scale correspond to nine divisions of the main scale. The figure below on the left shows the reading of this calipers with no gap between its two jaws. The figure on the right shows the reading with a solid sphere held between the jaws. The correct diameter of the sphere is

The figure of a centimetre scale below shows a particular position of the Vernier calipers. In this position, the value of shown in the figure is (figure is not to scale):

The vernier scale used for measurement has a positive zero error of If while taking a measurement it was noted that on the vernier scale lies between and . Vernier coincidence is then the correct value of measurement is
(least count)
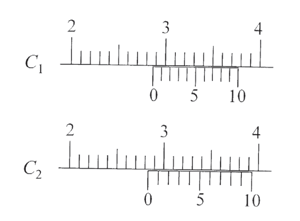
There are two vernier calipers both of which have divided into equal divisions on the main scale. The Vernier scale of one of the calipers has equal divisions that correspond to main scale divisions. The Vernier scale of the other caliper has equal divisions that correspond to main scale divisions. The readings of the two calipers are shown in the figure. The measured values (in ) by calipers and respectively, are


