Vernier Calipers and Screw Gauge
Vernier Calipers and Screw Gauge: Overview
This topic covers concepts, such as, Zero Error, End Correction, Measuring Instruments, Vernier Callipers & Screw Gauge etc.
Important Questions on Vernier Calipers and Screw Gauge
In a screw gauge, the zero of main scale coincides with fifth division of circular scale in figure (i). The circular divisions of screw gauge are It moves on main scale in one rotation. The diameter of the ball in figure (ii) is:

If division of main scale coincides with divisions of vernier scale. Given one main scale division is equal to units. Find the least count of the vernier.
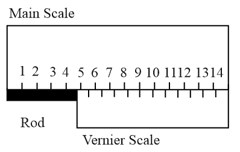
Consider the Vernier caliper as shown, the instrument has no zero error. The length of the rod (in ) shown is , if . Use . Write the value of .

The distance advanced by screw of a screw gauge is in four rotation. Its cap is divided into division. There is no zero error. If the screw reads divisions on the main scale and divisions on the cap, then the diameter of the wire is (in )-
The zero error is classified as:
The distance advanced by screw of a screw gauge is in four rotation. Its cap is divided into division. There is no zero error. If the screw reads divisions on the main scale and divisions on the cap, then the diameter of the wire is (in )-
End correction is a correction in :
The end correction is :
of main scale of a vernier callipers is divided into . The vernier scale had ___, so that least count of the callipers is .
The pitch of a screw gauge is 0.5 mm and there are 100 divisions on it circular scale. The instrument reads +2 circular scale divisions when nothing is put in between its jaws, when a wire is measured using this screw gauge main scale reads 3 pitch, while 31st division on the circular scale coincide with the reference line. The diameter of the wire is :
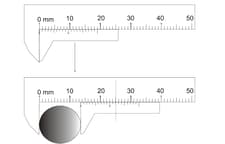
The diameter of a cylinder is measured using a vernier calipers with no zero error. It is found that the zero of the vernier scale lies between and of the main scale. The vernier scale has divisions equivalent to . The division of the vernier scale exactly coincides with one of the main scale divisions. The diameter of the cylinder is,
The diameter of a cylinder is measured using a vernier caliper with no zero error. It is found that the zero of the vernier scale lies between and of the main scale. The vernier scale have divisions equivalent to . The division of the vernier scale exactly coincides with one of the main scale divisions. The diameter of the cylinder is,
Backlash error corresponds to:-
A vernier calliper have a least count of main scale as . division of vernier scale are matches with divisions of main scale. The thickness of the object measured by the vernier callipers will be

When the gap is closed without placing any object in the screw gauge whose least count is the division on its circular scale coincides with the reference line on the main scale, and when a small sphere is placed, the reading on the main scale advances by divisions, whereas circular scale reading advances by five times to the corresponding reading when no object was placed. There are divisions on the circular scale. The radius of the sphere is:
There is screw gauge having main scale division as well as pitch of circular scale is Circular scale has divisions. If no object is placed then of main scale is not visible and division lies below reference main scale If wire is placed in between jaws, reading on main scale is and division matches with reference on main scale. The diameter of wire is
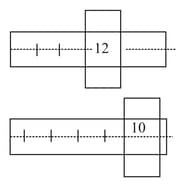
A screw gauge has some zero error but its value is unknown. We have two identical rods. When the first rod is inserted in the screw, the state of the instrument is shown by the diagram . When both the rods are in together in series then the state is shown by the diagram that is the zero error of the instrument?

In a screw gauge, complete rotations of the screw cause it to move a linear distance of . There are circular scale divisions. The thickness of a wire measured by this screw gauge gives a reading of main scale divisions and circular scale divisions. Assuming negligible error, the thickness of the wire is
A student measured the length of a rod and wrote it as . Which instrument did he use to measure it?
In a screw gauge, complete rotations of the screw cause it to move a linear distance of . There are circular scale divisions. The thickness of a wire measured by this screw gauge gives a reading of main scale divisions and circular scale divisions. Assuming negligible zero error, what is the thickness (in ) of the wire?
